Difference between revisions of "Getting Started"
m (→1. Download the PocketWizard Utility: tweaked wording) |
|||
| Line 24: | Line 24: | ||
<div class="mw-collapsible-content"> | <div class="mw-collapsible-content"> | ||
{| class ="wikitable" style="background-color: #ffffcc;" | {| class ="wikitable" style="background-color: #ffffcc;" | ||
| − | |'''Note:''' If you have installed Apple's Catalina OS (10.15) | + | |'''Note:''' If you have installed Apple's Catalina OS (10.15) you can install our beta version of the PocketWizard Utility that now provides 64 bit compatibility for Catalina. The current Utility will work on older versions of the Mac OS as well as PCs. Click here to download the [http://utility.lpadesign.com/utility/PocketWizard%20Utility%20Installer%202.12.dmg PocketWizard Utility Installer 2.12]. Download the release notes [https://wiki.pocketwizard.com/images/8/8f/Utility_2.12_beta.pdf here]. |
|} | |} | ||
# To update Legacy firmware in your radios or to upgrade to the E Release, first download the [http://utility.lpadesign.com/utility/PocketWizard%20Utility%20Installer%202.10.dmg PocketWizard Utility Installer 2.10] for OS X and macOS versions 10.8 (Mountain Lion) through 10.14 (Mojave) | # To update Legacy firmware in your radios or to upgrade to the E Release, first download the [http://utility.lpadesign.com/utility/PocketWizard%20Utility%20Installer%202.10.dmg PocketWizard Utility Installer 2.10] for OS X and macOS versions 10.8 (Mountain Lion) through 10.14 (Mojave) | ||
Revision as of 12:01, 10 March 2020
Thank you for using PocketWizard radios!
PocketWizard radios run on sophisticated firmware that is updated regularly. While the radios are shipped from the factory with the most updated version, sometimes new firmware is released between the time of it leaving our warehouse to being sold to a consumer. To see which version of firmware is installed on your PocketWizard and to ensure that you have the most current version for your new radios, please follow the steps below to first install our Utility program then update your radios to the most current firmware for your model. Find the appropriate match to your equipment then hit the Expand option to see more details in each step. You will need a standard USB to mini B USB cable to update the radios.
IMPORTANT NOTE: If you have an E Series radio, with the E Release firmware installed, it can only communicate with other E Series radios. If you have other PocketWizard radios with Legacy firmware, please refer to the E Release page of our Wiki for more compatibility information.
1. Download the PocketWizard Utility
Windows
- To update Legacy firmware in your radios or to upgrade to the E Release, first download the PocketWizard Utility Setup 2.10 for Windows versions 7 (SP1), 8.1, and 10.
- You will need to uninstall the previous version of the PocketWizard Utility before installing Version 2.10. Click here for instructions.
- Save the setup program to the directory of your choice (usually the Downloads folder)
- Run the setup program and follow the installation instructions. HIGHLY RECOMMENDED - Right click the setup program and "Run as Administrator"
- The PocketWizard Utility is now installed in your Start Menu. Find it there and run it! You can delete the setup program. HIGHLY RECOMMENDED - Right click the program and "Run as Administrator"
Mac
| Note: If you have installed Apple's Catalina OS (10.15) you can install our beta version of the PocketWizard Utility that now provides 64 bit compatibility for Catalina. The current Utility will work on older versions of the Mac OS as well as PCs. Click here to download the PocketWizard Utility Installer 2.12. Download the release notes here. |
- To update Legacy firmware in your radios or to upgrade to the E Release, first download the PocketWizard Utility Installer 2.10 for OS X and macOS versions 10.8 (Mountain Lion) through 10.14 (Mojave)
- Save the Installer Disk Image file (.dmg) to the directory of your choice (usually the Downloads folder)
- Open the downloaded .dmg file
- Run the PocketWizard installer package within the Disk Image, and follow the installation prompts
- The PocketWizard Utility is now installed in your Applications folder. Find it there and run it! You can delete the Installer Disk Image file (.dmg)
2. Check for Updates
MiniTT1, FlexTT5, FlexTT6, PowerST4, and PowerMC2
- Launch the PocketWizard Utility
- Connect your radio to your computer via a Mini-B USB cable
- The connected radio will be displayed in the top left of the Utility window.
- Note the current Firmware Version of the connected radio. If the Firmware Version matches the Current Versions listed below, skip steps 5 to 9 and proceed to the next radio.
- Under the Update Tab, click "Update Firmware", which will download the latest firmware version, and prompt to update the firmware in the connected radio.
- The Utility will update the firmware in the connected radio. Do not disconnect the radio while the progress bars are visible.
- After the Utility confirms a successful firmware update, disconnect the radio from your computer.
- Perform a Factory Reset of your radio, by holding TEST as you power on the radio for 10 seconds, until you see 4 green blinks in a row. Click here to view a video of this reset process
- Repeat the above steps for all of your radios, making sure all firmware versions match the Current Versions listed below.
Plus III / IIIe or Plus IV / IVe
- Launch the PocketWizard Utility
- Connect your radio to your computer via a Mini-B USB cable
- Once the Utility recognizes your radio, the connected radio will be displayed in the top left of the Utility window. You will also see the firmware, hardware, and loader versions of the unit.
- Note the current Firmware Version of the connected radio. If the Firmware Version matches the Current Versions listed below, disconnect the radio and turn the unit off if the radio is on.
- If you want to update the radio, click the Update Firmware box. You can choose between Legacy Firmware and E Release Firmware. E Release firmware is a new platform for our system and works differently than our original Legacy firmware. Please see see our E Release page for details. Click the box to select the option you want.
- For Legacy Firmware: click OK. Click OK in the confirmation window
- For E Release Firmware: enter your email address in the field provided and click Find and Apply License. Proceed to install the firmware. Once installed, the Firmware License will be tied to that serial number and it is non-transferable. Visit our E Release Firmware page to learn more about licenses.
- The Utility will update the firmware in the connected radio. Do not disconnect the radio while the progress bars are visible.
- After the Utility confirms a successful firmware update, disconnect the radio from your computer, and make sure the radio is turned off.
- Perform a Factory Reset of your radio, by holding the TEST button as you power on the radio.
- Repeat the above steps for all of your radios, making sure all firmware versions match the Current Versions listed below.
MultiMAX, MultiMAX II
- Launch the PocketWizard Utility
- Enable USB Mode on the MultiMAX:
- Turn off the MultiMAX
- Hold the Backlight button (between TEST and MENU), and connect the Mini-B USB cable to your computer
- Continue to hold the Backlight button, and move the power switch to Transmit
- Release the Backlight button
- The connected radio will be displayed in the top left of the Utility window.
- Note the current Firmware Version of the connected radio. If the Firmware Version matches the Current Versions listed below, skip steps X to X and proceed to the next radio.
- Under the Update Tab, click Check for Updates, which will download the latest firmware version, and prompt to update the firmware in the connected radio.
- The Utility will update the firmware in the connected radio. Do not disconnect the radio while the progress bars are visible.
- After the Utility confirms a successful firmware update, disconnect the radio from your computer, and move the power switch off.
- Perform a Factory Reset of your radio, by holding the C key as you power on the radio.
- Repeat the above steps for all of your radios, making sure all firmware versions match the Current Versions listed below.
Current Firmware Versions
| Radio | Firmware Version | Release Date | Release Notes |
|---|---|---|---|
| MiniTT1 / FlexTT5 Canon | 6.905 | 6/8/2017 | Release Notes |
| MiniTT1 / FlexTT5 Nikon | 3.909 | 4/26/2019 | Release Notes |
| FlexTT5 Panasonic | 1.132 | 8/24/2017 | Release Notes |
| FlexTT6 Canon | 7.003 | 8/24/2017 | Release Notes |
| PowerMC2 | 2.402/3 (FCC/CE) | 6/11/2013 | Release Notes |
| PowerST4 | 5.400 | 6/11/2013 | Release Notes |
| Plus III | 1.212 | 4/26/2019 | Release Notes |
| Plus IIIe | 2.505 | 12/11/2019 | Release Notes |
| Plus IV | 1.500 | 3/1/2016 | |
| Plus IVe | 2.605 | 12/11/2019 | Release Notes |
| MultiMAX | 7.53 | 4/1/2014 | Manual |
| MultiMAX II | 8.117 | 4/26/2019 | Release Notes |
Information about current Beta firmware (if any) is available here.
3. First Time Setup
MiniTT1, FlexTT5, & FlexTT6 - Canon
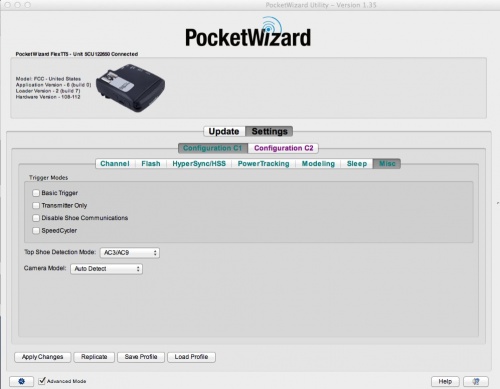
- For the radio that will be used as the transmitter attached to your camera, change the Camera Model setting to match the camera the radio will be attached to for Configuration C1. This setting is located under the Misc tab when your radio is connected to the PocketWizard Utility. Make sure to Apply Changes in the bottom left of the Utility window after applying this setting. Once the radio has briefly disappeared and reappeared in the Utility window (which confirms the settings have been applied to the radio), you can disconnect the USB cable. This step is only required once, or when the camera model changes.
- Turn everything off and install fresh batteries
- Set up your remotes:
- Slide your Speedlite onto a FlexTT5 and lock it down
- Turn the Speedlite on, and set it to ETTL - don't use "Master" or "Slave"
- Turn the FlexTT5 on to C.1 - a low power flash confirms it's ready
- Slide your MiniTT1 or FlexTT5 onto your camera and turn it on to C.1
- Turn on the camera, set the shutter speed to 1/160th, and shoot a calibration shot to prime the radios - the remote Speedlite won't fire
- Start shooting TTL pictures!

You're all set!
This is Basic Wireless TTL. Adjust your camera's Flash Exposure Compensation to change the power level of your Speedlite. You can't adjust power levels using the camera's [Flash control] menu settings, but there are easier and more powerful options:
| Next recommended reading: MiniTT1 and FlexTT5 |
MiniTT1 & FlexTT5 - Nikon
- Set your camera to use Auto-FP. On most Nikon Cameras, this is Custom Function e1, located under the Pencil menu. This setting should be set to the slowest shutter speed with the "(Auto FP)" option. Most Nikon cameras will use "1/250 (Auto FP)", although some will be 1/200 (Auto FP)".
- Connect your receiving flashes to their respective FlexTT5's. Turn the flash on, and set it to the normal TTL mode - NOT "Master" or "Slave" mode. Then, turn the FlexTT5 on to Configuration C1. Within a few seconds, a low power flash will be emitted from the directly-connected flash, confirming the flash and FlexTT5 are communicating through the hotshoe properly.
- Connect the transmitting MiniTT1 or FlexTT5 to your camera. Turn the radio on to Configuration C1.
- Turn on the camera, and set to 1/160th shutter speed. Take a test shot with the camera at this shutter speed - the remote flash will fire, but may not sync properly (this is a Calibration Shot for the radio). Take a second test shot, and your remote flashes will fire a TTL exposure!
Step 1 is only required once, or when you set up a new camera. The normal power-up sequence is Steps 2-4.
These steps are for basic TTL operation. Using an AC3? Continue Here Using a Master Nikon flash? Continue Here
PowerST4
- Connect your PowerST4 to your remote Elinchrom Flash, and power on the flash unit. The radio will power on when the flash is turned on.
- Follow the above instructions for starting up a Canon or Nikon transmitting radio.
- You will now be triggering your PowerST4! Use the in-camera Flash Exposure Compensation settings to adjust the power levels.
You can also use your AC3 or Canon / Nikon master flash controls to adjust the manual power level of the connected flash. See the respective links above.
PowerMC2
- Connect your PowerMC2 to your remote Einstein flash, and power on the flash unit. The radio will power on when the flash is turned on.
- Use the Einstein's LCD to change the Channel and Zone settings to channel: "CTL-01" and "Zone A"
- Follow the above instructions for starting up a Canon or Nikon transmitting radio.
- You will now be triggering your PowerMC2! Use the in-camera Flash Exposure Compensation settings to adjust the power levels.
You can also use your AC3 or Canon / Nikon master flash controls to adjust the manual power level of the connected flash. See the respective links above.
Plus III, Plus IV, MultiMAX, MultiMAX II
- With all equipment powered off, connect your remote radio to the camera or flash you'd like to trigger (with appropriate cable)
- Connect your transmitting radio to the hotshoe of your camera (or for a remote camera, simply have the radio in your hand)
- Power on the remote radio, the remote flash, and the transmitting radio.
- Ensure the Plus III/IV's are set to TxRx mode, or for a MultiMAX that the transmitting radio is set to Transmit, and the receiver to Receive mode.
- Set the Channels and Zones to match.
- Take a test shot, or press the TEST button, and the remote unit will fire!
4. Further Reading
For more information about specific topics, continue reading here:
And for more radio-specific information, start here: