Difference between revisions of "Plus III"
| Line 27: | Line 27: | ||
Your Plus III needs to be on the same channel as other PocketWizard radios. Channels can be set via the Plus III’s Channel Up/Down Buttons . When using Channels 17-32, you can specify Zones A, B, C, and D. See “Channels and Zones” section for more info. | Your Plus III needs to be on the same channel as other PocketWizard radios. Channels can be set via the Plus III’s Channel Up/Down Buttons . When using Channels 17-32, you can specify Zones A, B, C, and D. See “Channels and Zones” section for more info. | ||
| + | |||
| + | |||
| + | ==Remote Flash Triggering== | ||
| + | |||
| + | # Attach a Plus III to your camera’s hot shoe. You may also connect the Plus III radio to your camera’s PC sync port using the included cable. | ||
| + | # Connect a Plus III to your remote flash via the appropriate sync cable. | ||
| + | # Select Channel and Zone A, B, C, or D via Channel Up/Down Buttons and Zone Toggle Buttons. Set any other PocketWizard radios to a matching Channel and Zone. See the “Using Zones” section for more information. | ||
| + | # Take pictures normally at or below your camera’s X-sync speed. | ||
| + | '''Momentarily pressing the TEST button will test trigger the flash.''' | ||
Revision as of 09:53, 27 March 2012
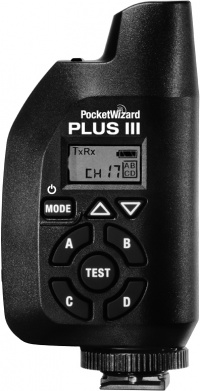
The Plus III is a radio transceiver, capable of acting as a transmitter or receiver for triggering remote flashes and cameras. It requires at least one other PocketWizard radio for wireless triggering. It can be connected to almost any remote flash or camera with the proper cable.
Like the Plus II, the Plus III is a manual flash trigger. It is compatible with all other PocketWizard radios operating on the same frequency. Learn more about the frequencies we use on our Frequency Page. It can transmit and receive on Standard Channels, not the ControlTL Channels used by some other radios for TTL flash and power control.
Contents
Plus III Basics
Connecting

|

| |
Connect a Plus III to your camera via the hot shoe. This will be your transmitting radio. Connect a Plus III to each of your remote flashes using the appropriate sync cable. These will be your receiving radios. If you are using a camera with no hot shoe, or the hot shoe cannot be used, connect the transmitting Plus III’s Flash/Camera Port to the camera’s sync terminal. Visit PocketWizard.com/support/cable_finder for correct camera cable.
Powering On/Off
Make sure batteries are properly installed. To turn on your Plus III, hold down the Power/MODE Button for about two seconds. The Status LED blinks green every few seconds to indicate normal operation. It will blink red in sync with a trigger. Hold down the Power/MODE Button for about two seconds to turn off your Plus III.
Channels & Zones
Your Plus III needs to be on the same channel as other PocketWizard radios. Channels can be set via the Plus III’s Channel Up/Down Buttons . When using Channels 17-32, you can specify Zones A, B, C, and D. See “Channels and Zones” section for more info.
Remote Flash Triggering
- Attach a Plus III to your camera’s hot shoe. You may also connect the Plus III radio to your camera’s PC sync port using the included cable.
- Connect a Plus III to your remote flash via the appropriate sync cable.
- Select Channel and Zone A, B, C, or D via Channel Up/Down Buttons and Zone Toggle Buttons. Set any other PocketWizard radios to a matching Channel and Zone. See the “Using Zones” section for more information.
- Take pictures normally at or below your camera’s X-sync speed.
Momentarily pressing the TEST button will test trigger the flash.
