HyperSync Setup
This page describes how to configure your PocketWizard radios for using HyperSync to capture flash above X-sync. This page will provide details on configuring your radios in the PocketWizard Utility for best HyperSync performance. HyperSync requires at least one ControlTL radio like the MiniTT1 and FlexTT5 to serve as the transmitter. Receiving radios may be ControlTL radios like the FlexTT5, PowerMC2, or PowerST4, or Standard Channel radios like the MultiMAX, Plus II, Plus III, or PlusX.
To learn what HyperSync is and how it differs from other flash sync techniques, visit the Understanding HyperSync and High Speed Sync page. For basic information on HyperSync, return to the main HyperSync page.
All ControlTL Radios – HyperSync Automation
Performing HyperSync is easiest with all ControlTL radios, transmitter and receivers. Non-ControlTL receivers (Standard Channel radios) do not have the benefit of HyperSync Automation, and require more manual adjustment for best results. While default HyperSync settings for ControlTL radios will usually provide great results, they may also be reconfigured by the photographer. First configure your transmitting MiniTT1 or FlexTT5, and then your receiving PocketWizard radio. Steps for configuring your ControlTL transmitter and receiver are detailed below.
How to Configure the ControlTL Transmitter
When using a MiniTT1 or FlexTT5 as a transmitter to perform HyperSync, follow these steps to configure your radio.
For Nikon users:
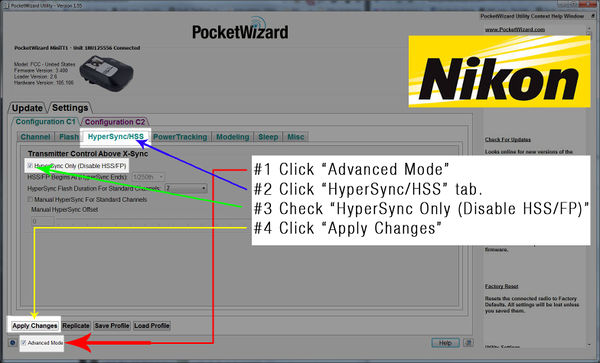
For the most consistent results and most flash energy in frame with Nikon radios, it is highly recommended that you enable “HyperSync Only:”
- Connect your transmitting MiniTT1/FlexTT5 to the PocketWizard Utility via USB, and check the "Advanced Mode" box
- Navigate to the "HyperSync/HSS" tab
- Enable “HyperSync Only”
- Click "Apply Changes"
If the “HyperSync Only” control is left at its default (disabled) less flash energy will be captured in frame and HyperSync will not be able to optimize flash timing.
For Canon users:
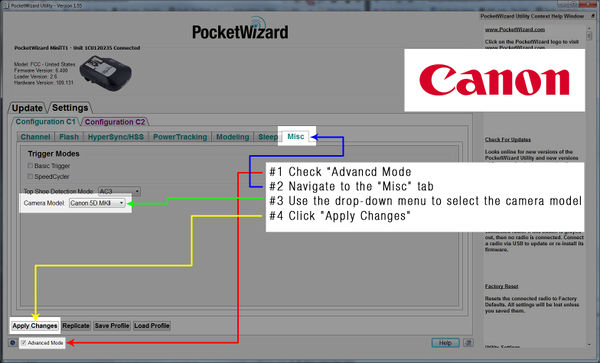
For best performance with Canon radios, it is highly recommended that you manually select your camera model:
- Connect your transmitting MiniTT1/FlexTT5 to the PocketWizard Utility via USB and check the "Advanced Mode" box
- Navigate to the "Misc” tab
- Use the drop-down menu to select the camera model
- Click "Apply Changes"
How to Configure the Receiving FlexTT5 and AC9 AlienBees Adapter
When using a Canon or Nikon FlexTT5 with an attached AC9 AlienBees Adapter as your receiver, follow these steps to configure your radio:
- Connect your receiving FlexTT5 to the PocketWizard Utility via USB and make sure that the “Advanced Mode” box is checked
- Navigate to the “HyperSync/HSS” tab and select the flash connected to the AC9 AlienBees Adapter using the "AC9 Flash" dropdown menu
- Set “Optimize HyperSync Automation For:” to either "Reduced Clipping" or "Highest Energy" (default =“Reduced Clipping”)
- Click "Apply Changes"
- Connect the receiving FlexTT5 and AC9 AlienBees Adapter to the flash
HyperSync Automation is currently implemented for the following Paul C. Buff flashes and AC9 Adapter:
| AlienBees AB400 | White Lightning X800 | Zeus 1250 |
| AlienBees AB800 | White Lightning X1600 | |
| AlienBees AB1600 | White Lightning X3200 | |
| AlienBees ABR800 RingFlash | White Lightning Ultra1200 |
If you wish to use a flash that does not appear on the list above with an AC9 AlienBees Adapter, try selecting a flash of a similar power output.
How to Configure the Receiving PowerMC2
When using a PowerMC2 as your receiver, follow these steps to configure your radio:
- Connect your PowerMC2 to the PocketWizard Utility via USB, and make sure that the “Advanced Mode” box is checked
- Navigate to “Optimize HyperSync Automation For:” on the “HyperSync/HSS” tab; choose "Reduced Clipping" or "Highest Energy"
- Click "Apply Changes"
- Connect the PowerMC2 to the flash
HyperSync Automation with the PowerMC2 is intended for use with the Einstein E640 flash. Using the Einstein’s “Color” mode will provide the best results. The E640 only provides its best HyperSync results when set to full power (+3 on the AC3 ZoneController or master Speedlite). Due to its IGBT design, settings lower than full power may result in clipping.
How to Configure the Receiving PowerST4
When using a PowerST4 as your receiver, follow these steps to configure your radio:
- Connect your PowerST4 to the PocketWizard Utility via USB, and make sure that the “Advanced Mode” box is checked
- Navigate to “Optimize HyperSync Automation For:” on the “HyperSync/HSS” tab; choose "Reduced Clipping" or "Highest Energy"
- Click "Apply Changes"
- Connect the PowerST4 to the flash or pack
HyperSync Automation is currently implemented for the following Elinchrom flashes and PowerST4:
| Style 300RX | Digital 1200RX or Digital 2400RX with Digital S Head |
Ranger RX with Ranger S Head |
| Style 600RX | Digital 1200RX or Digital 2400RX with Digital SE Head |
Ranger RX with Ranger A Head |
| Style 1200RX | Digital 1200RX or Digital 2400RX with Mini A Head |
Ranger RX Speed with Ranger S Head |
| Digital 1200RX or Digital 2400RX with Mini S Head |
Ranger RX Speed with Ranger A Head | |
| Digital 1200RX or Digital 2400RX with A3000 Head |
Ranger RX Speed A/s with Ranger S Head | |
| Digital 1200RX or Digital 2400RX with A6000 Head |
Ranger RX Speed A/s with Ranger A Head |
How to Configure the Receiving FlexTT5 P2 Port
When using a FlexTT5 as your receiver connected to a flash via the P2 port, follow these steps to configure your radio:
- Connect your receiving FlexTT5 to the PocketWizard Utility via USB, and make sure that the “Advanced Mode” box is checked
- Navigate to the “HyperSync/HSS” tab; use the “ P2 HyperSync Flash Duration” drop-down to select a timing setting – 10 is often a good starting-point
- Click "Apply Changes"
- Connect the FlexTT5 to the flash or pack via the P2 port and appropriate cable
If you notice clipping in frame, choose a different “P2 HyperSync Flash Duration” value - if you have a smaller flash or Speedlite connected via the P2 port, start by testing with lower numbers, if you have a studio strobe or larger flash, you will likely see the best results with higher numbers
ControlTL Transmitter, Standard Receiver
Performing HyperSync is possible with a ControlTL transmitter and Standard Channel receivers like the MultiMAX, Plus II, Plus III, or PlusX.
Only ControlTL radios have HyperSync settings that can be adjusted. When using Standard Channel radios as receivers, all HyperSync settings or offsets will need to be manipulated on the transmitter. The Standard Channel receivers need only be set to use the correct channel and then connected to the remote flashes. The transmitting MiniTT1 or FlexTT5 can account for the flash duration of remote flashes in one of two ways, “ HyperSync Flash Duration For Standard Channels” or “ Manual HyperSync For Standard Channels.” Find more information on these options on the HyperSync/HSS Tab page.
When using a mix of ControlTL and Standard Channel radios to perform HyperSync, determine whether you would like to use “HyperSync Flash Duration For Standard Channels” or “Manual HyperSync For Standard Channels.” and follow the instructions below.
How to Configure the ControlTL Transmitter - HyperSync Flash Duration For Standard Channels
Follow these steps to configure your ControlTL transmitter using HyperSync Flash Duration For Standard Channels:
- Connect your transmitting MiniTT1 or FlexTT5 to the PocketWizard Utility via USB and make sure that the “Advanced Mode” box is checked
- Navigate to the "HyperSync/HSS" tab
- Enable “HyperSync Only”
- Select a value 1-10 for the “HyperSync Flash Duration for Standard Channels” – 10 is often a good starting-point
- Canon users only: Navigate to the “Misc” tab and manually select your camera model
- Click "Apply Changes"
If you notice clipping in frame, choose a different “HyperSync Flash Duration for Standard Channels” value – some experimentation may be necessary to find the best setting for your camera and flash combination
How to Configure the ControlTL Transmitter - Manual HyperSync For Standard Channels
Follow these steps to configure your ControlTL transmitter using Manual HyperSync For Standard Channels:
- Connect your transmitting MiniTT1 or FlexTT5 to the PocketWizard Utility via USB and make sure that the “Advanced Mode” box is checked
- Navigate to the "HyperSync/HSS" tab
- Enable “HyperSync Only”
- Enable “Manual HyperSync For Standard Channels” by clicking the check-box
- Use the slider to set a Manual HyperSync Offset – the greatest offset (all the way to the left) is often a good starting point
- Canon users only: Navigate to the “Misc” tab and manually select your camera
- Click "Apply Changes"
If you notice clipping in frame, choose a different Manual HyperSync Offset value – typically the maximum offset (slider all the way to the left) works well as a starting point. Not all cameras can use the full range of this setting. Some cameras will show no change beyond certain offset value. This is a limitation of the camera. Some experimentation may be necessary to find the best setting for your camera and flash combination

