Difference between revisions of "HyperSync"
(→AC9 AlienBees Adapter) |
(→What is HyperSync?) |
||
| (41 intermediate revisions by 5 users not shown) | |||
| Line 2: | Line 2: | ||
__TOC__ | __TOC__ | ||
| − | |||
| − | |||
| − | |||
| − | |||
| + | On this page you will find everything you need to know about HyperSync®, and how to make it a valuable tool you can rely on. | ||
| − | |||
| − | + | In the sections below you will be introduced to the main principles of HyperSync and how you might use it in your own photography. There are links to additional pages with in-depth information explaining how HyperSync works, how to set up your radios for HyperSync, and some example images illustrating the results you can expect. | |
| − | + | <br/> | |
| − | + | <br/> | |
| + | ==What is HyperSync?== | ||
| − | + | [[File:PW HyperSync GarthMilan 2013.jpg|thumb|right|400px|Garth Milan: “I was using a single Elinchrom Ranger power pack, along with an Elinchrom Ranger (S head, I believe). I only had the one pack and head, as I had to hike quite a ways back for this shoot. And yes, I use the PowerST4."]] | |
| + | HyperSync is a feature exclusive to PocketWizard radios that allows you to shoot at speeds faster than your cameras X-sync while using studio strobes. | ||
| − | |||
| + | Unlike HSS/Auto-FP (High Speed Sync) which allows speedlights to sync up to 1/8000th with pulsed light, HyperSync uses precise timing to capture the most flash energy in the frame. You can see real world examples of HyperSync usage from professional working photographers throughout these pages. You can click on the photos for camera and exposure information. | ||
| + | If you are curious about how HyperSync works on a more scientific level, how it differs from HSS, and an in-depth look at how these features work, please visit the following page: | ||
| − | |||
| − | |||
| − | |||
| − | |||
| − | |||
| − | |||
| − | |||
| + | * [[Understanding HyperSync and High Speed Sync]] | ||
| − | |||
| − | |||
| − | |||
| − | |||
| − | |||
| − | |||
| − | |||
<br clear=all> | <br clear=all> | ||
| − | == | + | ==HyperSync Setup== |
| − | [[File: | + | [[File:PRW0513 PWHyperSync072 v2.jpg|thumb|400px|Pete Webb: “I used 2 Elinchrom Ranger RX packs, with 'S' heads, with a MiniTT1 on the Canon 5D Mark III and FlexTT5's on the rangers.”]] |
| − | + | ||
| − | + | HyperSync timing adjustments can only be calculated by our ControlTL line of transmitters ([[MiniTT1 and FlexTT5]]), but can be used by any of our Standard or ControlTL receivers. | |
| − | + | ||
| − | + | ||
| − | + | ||
| − | + | ||
| − | + | ||
| − | + | ||
| − | + | Depending on what you are photographing and what equipment you are using there are several different ways to optimize your radios. | |
| − | + | To learn how to use the [[HyperSync/HSS Tab]] located in the [[PocketWizard Utility]] to configure your radios for optimal HyperSync performance with your photo equipment, please visit the following page: | |
| − | [[ | + | |
| − | [[ | + | |
| − | + | ||
| − | + | ||
| − | |||
| + | * [[HyperSync_Setup|HyperSync Setup]] | ||
| − | |||
| − | |||
| − | |||
| − | |||
| − | |||
<br clear=all> | <br clear=all> | ||
| − | == | + | ==When to Use HyperSync== |
| − | + | HyperSync has been available since just after the introduction of the MiniTT1 and FlexTT5, but we have found that there are still many photographers who don’t know how HyperSync can help them. Below are three of the most common uses of/reasons to use HyperSync. | |
| − | |||
| − | + | ===Freezing Action=== | |
| − | + | [[File:Garrison.jpg|thumb|400px|2 Elinchrom Ranger RX and S heads were used with PowerST4s for this photograph.]] | |
| − | + | The ability to use flash above your cameras [[Understanding HyperSync and High Speed Sync#X-Sync - Flash behavior with normal sync limits|X-Sync]] (in some cases up to 1/8000th!) allows you to freeze action like never before. With HyperSync you can light fast moving subjects without worrying about motion blur; be it on the sports field, dance floor, or in the studio. | |
| − | |||
| − | + | <br clear=all> | |
| − | + | ===Overpowering the Sun=== | |
| + | [[File:Pocketwizard-olli-krause-02.jpg|thumb|200px|Olli Krause:“HyperSync is a nice and easy way to get around the X-Sync time of your camera and put the control of the light back into your hands. Shooting with up to 1/8000 sec and a wide open aperture around f/2 is lots of fun.”]] | ||
| − | + | When using HyperSync you can reduce the ambient light apparent in your photograph by using higher shutter speeds, but still achieve sync with studio strobes. This means in bright sunlight you can darken the ambient light in the background. Being able to achieve higher shutter speeds also allows you to use a wider aperture. A wider aperture allows for a shallower depth of field. More control over both the ambient light and the depth of field means more creative control for you in any situation. | |
| − | |||
| − | |||
| − | + | <br clear=all> | |
| − | ===[[ | + | ===More Power=== |
| + | [[File:Eric Seo 20130516 S D'Artois 010.jpg|thumb|400px|Erik Seo: "Elinchrom Ranger RX AS Speed pack with an A-Head. I was using a FlexTT5 as both a transmitter and receiver. You can see the little flash head cover it was sitting in, bottom right hand side of the big jump wedge. No other lighting was used on that particular photo."]] | ||
| − | + | Photographers have been able to reach shutter speeds of 1/8000th with speedlites with HSS/Auto-FP for years, but one of the biggest differences between [[Understanding HyperSync and High Speed Sync|HSS and HyperSync]] is power. Studio strobes are able to provide much more flash power. This gives the option of lighting larger subjects at higher shutter speeds with the flash further away. | |
| − | + | ||
| − | 1 | + | |
| − | |||
| − | + | <br clear=all> | |
| − | + | ==HyperSync Performance with your Camera== | |
| + | [[File:Motorcycle shot w logo and info.jpg|thumb|Canon EOS 7D at 1/6400 F/2.8]] | ||
| + | [[File:7d motorcycle gradient.jpg|thumb|Canon EOS 7D at 1/6400 F/11]] | ||
| − | + | One of the most common questions we receive about HyperSync is “What kind of results can I get with my gear?” We at PocketWizard have been testing HyperSync performance and recording the outcome of many of the most popular camera and flash combinations. To view the results for your gear select your camera from one of the grids below, and find your lighting system on the subsequent page. If you do not see your combination of camera and flash, check back again soon – we will be adding more combinations in the future. | |
| + | |||
| − | + | Please note that white wall performance is presented so you can see the visual effects of the shutter and flash duration. White wall performance is often not representative of what HyperSync can do for your photography in real-world conditions. It is impossible to recreate every real-world situation in a testing environment, and not every photographer’s level of acceptability is the same. Many photographers find the gradient visible on the white wall blends into the environment when shot outside (see example to the left.) Others may correct for the gradient in post-production. Users will want to experiment to see what works best for their individual needs. | |
| − | + | You can read more about how to manage clipping and gradation in your images by visiting the page below: | |
| − | + | * [[Clipping and Gradient]]. | |
| − | + | ||
| − | + | ||
| − | |||
| − | |||
| − | + | {{C HATT}} | |
| + | {{N HATT}} | ||
| − | |||
| − | + | {{Don't see your gear?}} | |
| − | + | <br clear=all> | |
| − | + | ||
| − | + | ||
| − | + | ||
| − | + | ||
| − | + | ||
| − | + | ||
| − | + | ||
| − | + | ||
| − | + | ||
| − | + | ||
| − | + | ||
| − | + | ||
| − | + | ||
| − | + | ||
| − | + | ||
| − | + | ||
| − | + | ||
| − | + | ||
| − | + | ||
| − | + | ||
| − | + | ||
| − | + | ||
| − | + | ||
| − | + | ||
| − | + | ||
| − | + | ||
| − | + | ||
| − | + | ||
| − | + | ||
| − | + | ||
| − | + | ||
| − | + | ||
| − | + | ||
| − | + | ||
| − | + | ||
| − | + | ||
| − | = | + | |
| − | + | ||
| − | + | ||
| − | + | ||
| − | + | ||
| − | + | ||
| − | + | ||
| − | + | ||
| − | + | ||
| − | + | ||
| − | + | ||
| − | + | ||
| − | + | ||
| − | + | ||
| − | + | ||
| − | + | ||
| − | + | ||
| − | + | ||
| − | + | ||
| − | + | ||
| − | + | ||
| − | + | ||
| − | + | ||
| − | + | ||
| − | + | ||
| − | + | ||
| − | + | ||
| − | + | ||
| − | + | ||
| − | + | ||
| − | + | ||
| − | + | ||
| − | + | ||
Latest revision as of 11:28, 20 May 2015
| Next recommended reading: High Speed Sync |
Contents
On this page you will find everything you need to know about HyperSync®, and how to make it a valuable tool you can rely on.
In the sections below you will be introduced to the main principles of HyperSync and how you might use it in your own photography. There are links to additional pages with in-depth information explaining how HyperSync works, how to set up your radios for HyperSync, and some example images illustrating the results you can expect.
What is HyperSync?
HyperSync is a feature exclusive to PocketWizard radios that allows you to shoot at speeds faster than your cameras X-sync while using studio strobes.
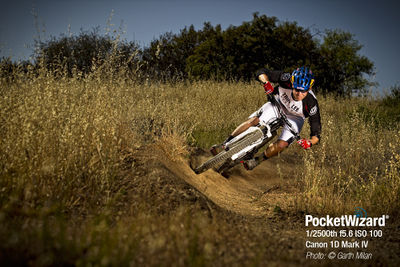
Unlike HSS/Auto-FP (High Speed Sync) which allows speedlights to sync up to 1/8000th with pulsed light, HyperSync uses precise timing to capture the most flash energy in the frame. You can see real world examples of HyperSync usage from professional working photographers throughout these pages. You can click on the photos for camera and exposure information.
If you are curious about how HyperSync works on a more scientific level, how it differs from HSS, and an in-depth look at how these features work, please visit the following page:
HyperSync Setup
HyperSync timing adjustments can only be calculated by our ControlTL line of transmitters (MiniTT1 and FlexTT5), but can be used by any of our Standard or ControlTL receivers.
Depending on what you are photographing and what equipment you are using there are several different ways to optimize your radios.
To learn how to use the HyperSync/HSS Tab located in the PocketWizard Utility to configure your radios for optimal HyperSync performance with your photo equipment, please visit the following page:
When to Use HyperSync
HyperSync has been available since just after the introduction of the MiniTT1 and FlexTT5, but we have found that there are still many photographers who don’t know how HyperSync can help them. Below are three of the most common uses of/reasons to use HyperSync.
Freezing Action
The ability to use flash above your cameras X-Sync (in some cases up to 1/8000th!) allows you to freeze action like never before. With HyperSync you can light fast moving subjects without worrying about motion blur; be it on the sports field, dance floor, or in the studio.
Overpowering the Sun
When using HyperSync you can reduce the ambient light apparent in your photograph by using higher shutter speeds, but still achieve sync with studio strobes. This means in bright sunlight you can darken the ambient light in the background. Being able to achieve higher shutter speeds also allows you to use a wider aperture. A wider aperture allows for a shallower depth of field. More control over both the ambient light and the depth of field means more creative control for you in any situation.
More Power
Photographers have been able to reach shutter speeds of 1/8000th with speedlites with HSS/Auto-FP for years, but one of the biggest differences between HSS and HyperSync is power. Studio strobes are able to provide much more flash power. This gives the option of lighting larger subjects at higher shutter speeds with the flash further away.
HyperSync Performance with your Camera
One of the most common questions we receive about HyperSync is “What kind of results can I get with my gear?” We at PocketWizard have been testing HyperSync performance and recording the outcome of many of the most popular camera and flash combinations. To view the results for your gear select your camera from one of the grids below, and find your lighting system on the subsequent page. If you do not see your combination of camera and flash, check back again soon – we will be adding more combinations in the future.
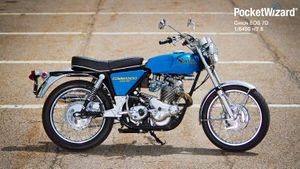
Please note that white wall performance is presented so you can see the visual effects of the shutter and flash duration. White wall performance is often not representative of what HyperSync can do for your photography in real-world conditions. It is impossible to recreate every real-world situation in a testing environment, and not every photographer’s level of acceptability is the same. Many photographers find the gradient visible on the white wall blends into the environment when shot outside (see example to the left.) Others may correct for the gradient in post-production. Users will want to experiment to see what works best for their individual needs.
You can read more about how to manage clipping and gradation in your images by visiting the page below:
| Canon 1D X | Canon 7D | Canon 70D | Canon Rebel T5i (700D) |
| Canon 1D Mark IV | Canon 6D | Canon 60D | Canon Rebel T5 (1200D) |
| Canon 1Ds Mark III | Canon 5D Mark III | Canon 50D | Canon Rebel SL1 (650D) |
| Canon 1D Mark III | Canon 5D Mark II | Canon 40D | Canon Rebel T4i (650D) |
| Canon 1Ds Mark II | Canon 5D | Canon 30D | Canon Rebel T3i (600D) |
| Canon 1D Mark II N | Canon 20D | Canon Rebel T3 (110D) | |
| Canon 1D Mark II | Canon Rebel T2i (550D) | ||
| Canon Rebel T1i (500D) | |||
| Canon Rebel XSi (450D) | |||
| Canon Rebel XTi (400D) | |||
| Canon Rebel XT (350D) | |||
| Canon Rebel XS (1000D) |
| Nikon D4S | Nikon D810 | Nikon D7100 | Nikon Df |
| Nikon D4 | Nikon D800 | Nikon D7000 | |
| Nikon D3x | Nikon D800E | Nikon D5300* | Nikon D90 |
| Nikon D3s | Nikon D700 | Nikon D5200* | Nikon D80 |
| Nikon D3 | Nikon D610 | Nikon D5100* | Nikon D40x* |
| Nikon D2x | Nikon D600 | Nikon D5000* | Nikon D40* |
| Nikon D300s | Nikon D3300* | ||
| Nikon D300 | Nikon D3200* | ||
| Nikon D200 | Nikon D3100* | ||
| Nikon D3000* |
* These cameras do not support HyperSync or HSS/FP-Sync operation: D5300, D5200, D5100, D5000, D3300, D3200, D3100, D3000, D40x, D40
| Don't see your gear? |
|---|
| We have paused our HyperSync testing and PDF production for the time being. We may be adding more results to the wiki as they become available. Check back in the future. |
